If you research how to optimize Snowflake queries to reduce costs, you’ll find many customers rely on tedious and manual processes, making it an ideal target for AI and automation.
Snowflake recently released on-demand recordings of the most popular presentations from the 2023 Snowflake Summit conference. What I was expecting to see was a long list of AI related topics. After all, AI was the big theme of the show. For example, the main executive keynote was titled “Generative AI’s Impact on Data Innovation in the Enterprise.” Of the 45 on-demand sessions, five of them were about LLMs, Generative AI, and other AI topics. What surprised me, though, is that AI was not the most popular topic from Snowflake Summit 2023.
Instead, there are seven sessions about cost savings, specifically how to optimize Snowflake to reduce costs. For sure, optimization is not the hot topic like AI. But the fact that there were more cost saving sessions is recognition that while AI is an important capability for the future, Snowflake customers see saving money as a pressing concern now.
But you don’t need to choose between leveraging AI and saving money. These can come together today in an intriguing way, and I’d like to show you how in this article. First, I will summarize the cost saving sessions at Snowflake Summit, in particular the presentations on optimization processes by two of Snowflake’s largest customers. We can learn some valuable best practices from these processes. Second, I will discuss how these processes might not work for every customer, and how AI technology available today can help any Snowflake customer run as optimally and cost efficiently as possible. In a very real way, cost saving can be the first AI project your team does. And the good news is you don’t need to be an AI expert to leverage it for reducing your Snowflake cost.
Before we look at the optimization process that top Snowflake customers use, it is helpful to understand the main optimization target. There are lots of things you can optimize in Snowflake, but for those just starting out to reduce Snowflake costs, the priority is clear.
The top way to reduce Snowflake costs
Simply put, here is where your efforts begin: setting an optimal warehouse size. In case you aren’t familiar with how warehouse sizes work in Snowflake, let’s review briefly.
How Snowflake data warehouse sizes work
Size in this case does not refer to storage, but computing power. The larger the warehouse, the faster it can handle a compute task (query). In general, the bigger and more complicated your query workload, the larger your warehouse should be–enough to process queries in time to satisfy your users’ requirements or SLAs. Snowflake currently offers the following “T-shirt” sizes:
| Warehouse size | Credits per hour (cost) |
| X-small | 1 |
| Small | 2 |
| Medium | 4 |
| Large | 8 |
| X-large | 16 |
| 2X-large | 32 |
| 3X-large | 64 |
| 4X-large | 128 |
| 5X-large | 256 |
| 6X-large | 512 |
Warehouse size and Snowflake cost
Did you notice that your cost will double with each increase in warehouse size? This is why every cost saving strategy prioritizes warehouse size. The basic idea is to pick a warehouse size that will efficiently process most of your queries and meet your response time SLA. Sizing based on your biggest query would mean you are paying too much, since most of the time you will be paying for an underutilized warehouse. On the other hand, if your warehouse is undersized, your queries could “spill” out of memory and need to access storage, either local (slow) or remote (very slow). The result of spillage is slow or even failed queries and the unhappy users that follow.
On the surface, this seems to be straightforward: increasing your warehouse size will mean queries run faster and hopefully fast enough to make up for the doubling of cost. But in reality there is more nuance. For more information on this, see part 3 of our series on Snowflake Optimization.
What I would like to focus on here is the process top Snowflake customers use to optimize warehouse size. A repeatable process is critical because setting a parameter like warehouse size is not a one-time thing. Your analytic workloads are dynamic, and the setting that you use today might not work tomorrow.
A 3-step process for Snowflake optimization
In the presentations I watched, not every customer does exactly the same thing, but there are common themes. I’ve summarized all the best practices into a 3-step process.
Step 1: Write good queries
If your queries are not optimized to begin with, there is little you can do to optimize Snowflake and save money. It makes sense–an optimized query will require less computing power and thus a smaller, cheaper warehouse. So with an eye on optimizing warehouse size, I categorize the query optimization advice from Snowflake Summit like this:
- Process as little data as possible. I say this at the risk of stating the obvious. But the fewer columns you choose, the better for performance and thus for cost.
- Avoid common SQL mistakes. There are many different ways to achieve the same results with SQL. The technique you choose can use a lot of processing time and drive up your costs. We’ve compiled a list of the top 7 SQL mistakes we see Snowflake customers make.
- Be careful with clustering. Snowflake stores your data in micro-partitions. The more partitions you need to scan for your query, the slower and thus costlier the query becomes. By default, Snowflake stores your data in the order it was ingested. This results in a sort of “natural cluster” where all your recent data is grouped together by time. This works well as most queries are narrowing down the data (pruning) by a time period. So you should be hesitant to change this unless you have special circumstances, such as querying by event from streaming data.
In addition to these basic categories, some Snowflake customers report great results from materialized views. This is a subject I hope to cover in future articles, but let’s keep the focus here on the overall process Snowflake recommends for optimizing warehouse size.
Step 2: Monitor key performance parameters
You’ve probably heard the classic management mantra: you can only manage what you measure. The customers that presented at Snowflake Summit certainly took this to heart. Each of them created custom dashboards using Snowsight (the online SQL tool for Snowflake) to measure several different performance metrics. You could also use Snowflake’s Query Profile that is available in the classic console. Again, with an eye toward warehouse size optimization, the most common query performance metrics are:
| Bytes scanned | In general, the higher the bytes scanned to answer a query, the larger the warehouse needed. If most queries scan less than a GB you probably only need a small or extra small warehouse. |
| Execution time | If this is high, it indicates expensive (long-running) queries. You need to either optimize these queries or scale-up to a larger warehouse. |
| Query load percent | If this is less than 50 for a query, it should be moved to another warehouse or you could increase the warehouse size. |
| Bytes spilled to local and bytes spilled to remote | This indicates the warehouse is undersized. Bytes that can’t fit into memory “spill” to storage. This will be slow on local storage and even slower on remote storage. |
| Queued time | A query that is competing with others for resources will have a high queued time. Increase warehouse size or move queries to a less utilized warehouse. |
There are many other parameters you can measure (again, a subject for a different day) and most of the customers presented dashboards that looked at big picture items too, such as credits used (spend) per warehouse and account.
Step 3: Make warehouse size optimizations
Once you start tracking performance metrics, you have the data you need to begin making adjustments. Since warehouse size was always brought up as the most important optimization factor, let’s look at that as our example here.
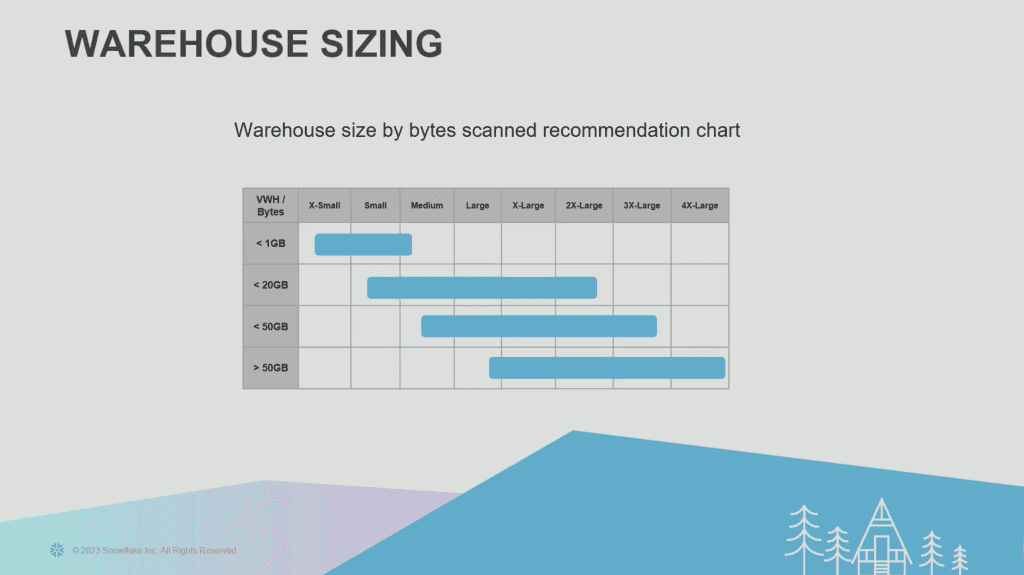
One of the key parameters to track is bytes scanned. You can then translate that to recommendations for warehouse size. The following chart was shown several times at Snowflake Summit:

So if your bytes scanned is between 1-20GB, the recommendation is either a small, medium, large, x-large or 2x-large warehouse. Now I don’t want to seem ungrateful for the advice here, but what exactly am I supposed to do with this information? I’d love more specifics. Unfortunately, that can’t be determined since query workloads vary wildly. Even in Snowflake’s own documentation, the advice is to experiment until you find the ideal size: “Experiment by running the same queries against warehouses of multiple sizes (e.g. X-Large, Large, Medium). The queries you experiment with should be of a size and complexity that you know will typically complete within 5 to 10 minutes (or less).”
Any Google search on the subject of Snowflake warehouse sizing will reveal essentially the same advice. But you can cut down on the guesswork by building and monitoring a report that will show you key metrics like those mentioned above.
The trouble with optimizing Snowflake
Let’s summarize what we’ve learned so far.
- Create optimized queries to begin with
- Monitor several key parameters for warehouse size
- Use the data to optimize the warehouse size
If you came to this article hoping to save money on Snowflake, this can seem like a helpful place to begin. But maybe by now it is becoming apparent how daunting this task is going to be. There are two challenges we need to resolve to make this sustainable.
Resources
We’ve only examined what you need to do to optimize one key parameter: warehouse size. While this is critical for you to do, there are lots of other important parameters as well, such as suspension and clustering. And entire books can be written about other topics like optimizing data ingestion and queries.
Who is going to do all this? Someone needs to ensure optimum queries, create and monitor performance results, and then adjust the warehouse size. It would be nice to have a large data team for this, and some Snowflake customers do. But even for those large teams, their efforts are better spent on other tasks, particularly building data pipelines and directly supporting the analytics needs of the business.
I think the bigger question, though, is why should we have to spend so much money and effort just to save money and effort? If ever there was a use case for AI and robotics in the Snowflake world, this would be it.
Constant change
Even if you build a team to optimize Snowflake, or make time to do it yourself, you still face another quandary: you’ve only optimized to the workload you have now. When your workload changes, the optimizations you spent so much time on could become instantly irrelevant.
How Keebo’s AI automates Snowflake optimization
The way to solve the resourcing issue and the quandary posed by a dynamic environment is to enlist your own army of robots. At Keebo, our mascot is a friendly robot dog, because this is what we do 24/7/365: optimize Snowflake warehouses. While I’ve got you here, allow me to explain how Keebo works.
Always watching
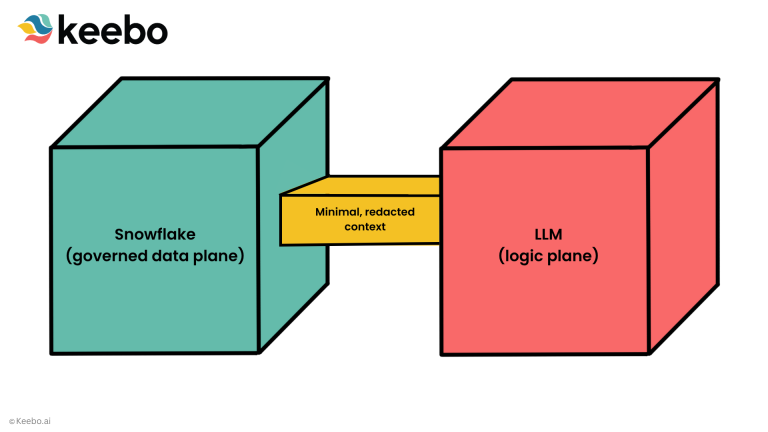
I listed 5 key parameters earlier in this article. Keebo monitors 76 Snowflake usage metadata fields and we monitor them constantly. It’s important to note that we only access usage metadata, never your user or business data. We then train our proprietary machine learning algorithms on this data to make predictions and constantly optimize your warehouse.
Always optimizing
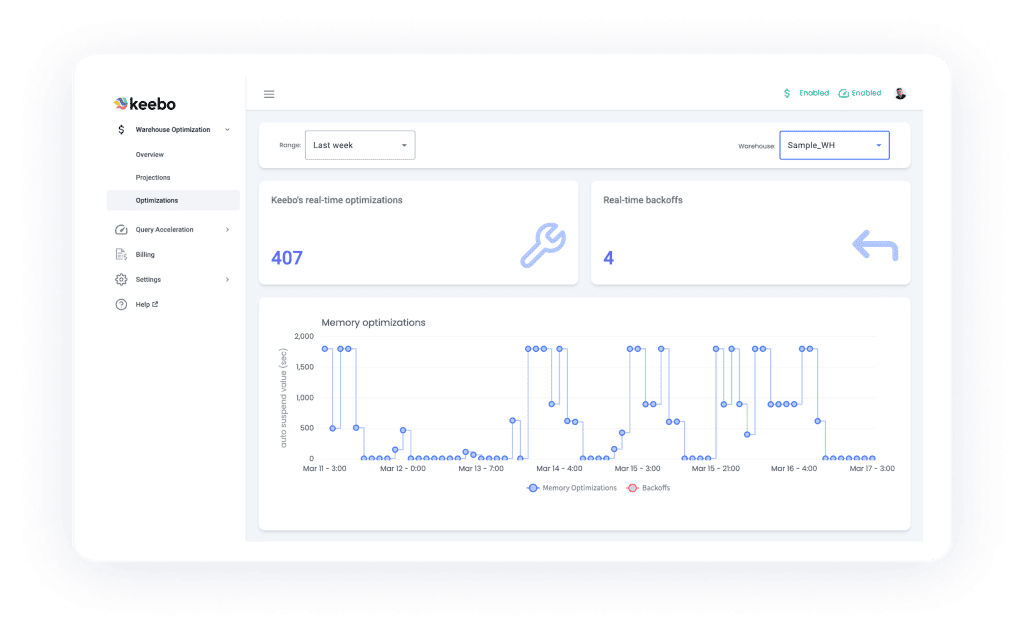
Not only do we optimize the most important parameter, warehouse size, we optimize warehouse suspension and clustering, too. You set how aggressive you want our robots to be in finding savings, and then we do the work, freeing up your time. This screenshot shows the optimizations we are doing in real time of just the auto-suspend settings for one week of a customer’s warehouse:

And this works both ways, too–if an optimization turns out to be less than ideal (for example, it is slowing down queries), Keebo will automatically adjust, no matter the day or time. This is important for you to consider if you are planning to do manual optimizations. If something goes wrong, will you be there to adjust again even if it is the middle of the night or the middle of your hard-earned vacation?
It is important to find a solution that can do the actual optimizations for you. When it comes to step 2 of the optimization process–monitoring key performance parameters–there are plenty of products on the market that can show you reports and dashboards instead of building them yourself. But Keebo is the only fully-automated solution that goes beyond “observe and report” to do step 3 for you–the actual work.
Price is based on savings
I mentioned earlier that we shouldn’t have to spend money and time to save money and time. This is the spirit behind Keebo’s pricing. Our price is based on how much we save you. We take a percentage of the money you save on Snowflake–a third or less–meaning Keebo will pay for itself in addition to putting a lot of money back into your pocket.
You can see what our own customers have to say in our collection of customer stories. And if Keebo seems like an intriguing solution to put the power of AI to work in saving you money on Snowflake, you can get all the details and demos you need with our evaluation guide. We offer a free trial as well to get you on your way.


